Showing posts with label kits 2 remember. Show all posts

Wednesday, January 6, 2010

Inspirational Card Sketches #48

Boy does it feel good to be doing something besides a Christmas card. Don't get me wrong I love them but I was starting to get burned out...lol.

Today the new sketch went up at ICS. Yes, we know it is late but things got busy!
Here is the fabulous sketch by Dawn.

And I made a Valentine's card with it! I kept it true to the sketch just flipped it since my heart kinda pointed to the right. I used up some old stash with this one too, papers and stickers.
supplies: DCWV pp and cs, Offray ribbon, layered sticker from Walmart, sentiment sticker unknown, tulle, colorbox ink

I hope you will join us! Be sure to check out what the rest of the design team came up with at the ICS blog.
Also a little announcement. I am sad to say that Jessica has decided to shut down the kits2remember store. She is having a big sale between now and Jan 10th. So be sure to stop by and grab some acrylic, metal etc if you need some. I will miss being a part of the k2r design team but things have to change. I wish Jessica all the best!

Saturday, November 28, 2009

I hope everyone had a wonderful Thanksgiving! I know we did. We spend Thursday with Nick's family and Friday with mine and some friends we haven't seen in quite awhile. It was a nice relaxing holiday with no major drama...lol. It always seems there is some when you get a bunch of family members together...lol

Today it is time for another challenge over at Stamp, Scrap & Doodle. This week we are gearing up for Christmas so that is what we want to see. A Christmas card, layout or altered item!

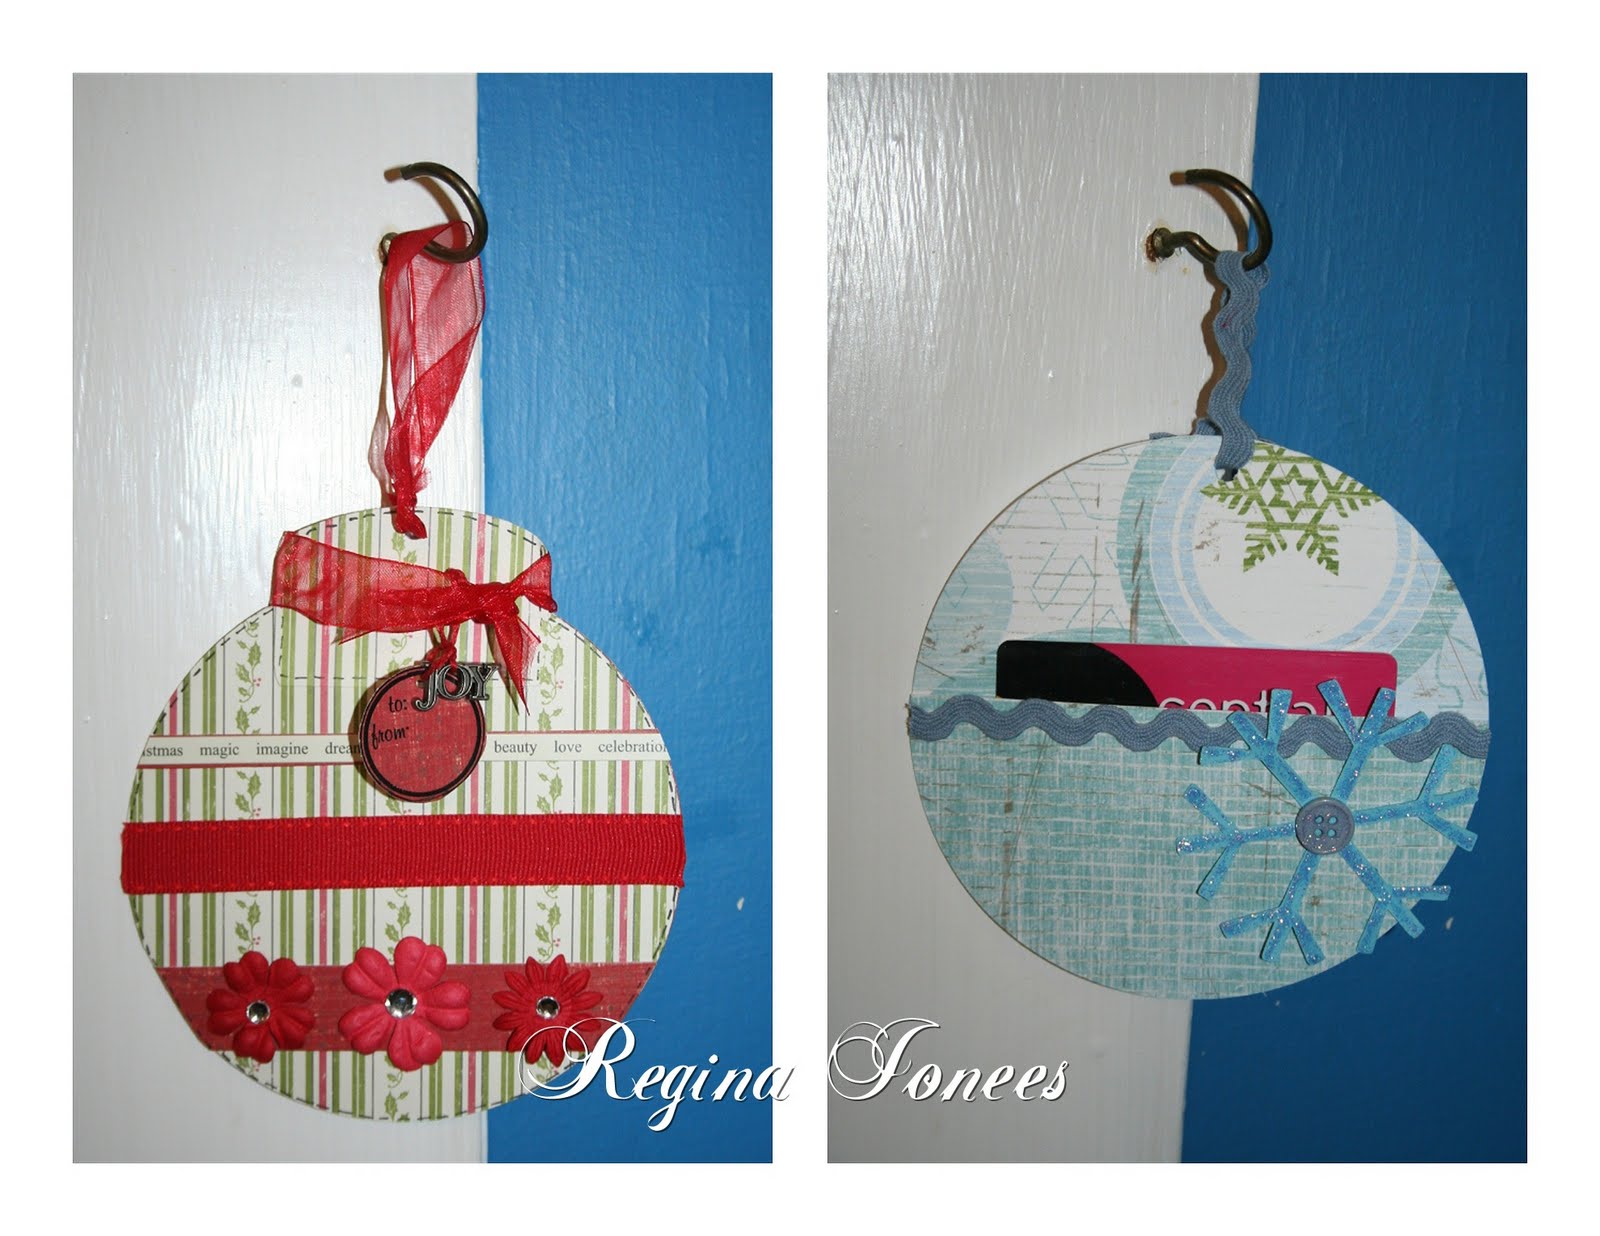
I made a few of these gift card ornaments last year I believe with directions from an online crop I was participating in at the time. Sorry but I don't remember which one!

They are super simple. In the past I made them with just pattern paper but this time I used a chipboard base (from kits2remember) for the ornaments. The red one has a little pocket on the back right below the ornament top to hold a gift card and the blue one is on the front.
They were pretty simple and fast to make and I think a cute way to present a gift card.

supplies for red one: Making Memories charm and pp, Pebbles Inc ribbon, Hambly rubon, embrodery floss, Prima flowers, gems supplies for blue one: Reminisce pp, ric rac, snowflake die, button, stickles

This one also works for the challenge at Cupcake Crafts (make a gift card holder).

It is also time for a new challenge at Scrap and Stamp. Unfortunately I can't load my layout right now. I loaned my camera to my cousin who was going out of town since hers died. And I forgot to download the picture first...lol. silly me! So I will post it in a few days. I hope you will still head over to Scrap and Stamp to see what the rest of the design team did and to see what the prize is this week. Whats the challenge you ask....well it is fall traditions with at least one stamp. We all have traditions we carry on with so we want to see them large and small!

Monday, November 16, 2009

Joy is in the air...

I know it has been awhile since I have had a kits2remember project to share and I am sorry about that. Life has just gotten in the way. But I am here now with a little project.

I wanted a hanging decoration for the doorknob on the front door for Christmas. So I decided to use three 4inch acrylic circles from k2r. I covered them all with some Daisy Bucket papers. The "ribbon" I made by cutting strips of the pattern papers and wetting them so that I could crinkle them up. After they were dry I stretched them out a little bit and adhered to the back of the circles. It gives the look of ruffled ribbon but with the sturdiness of paper. I painted some Deja View alphas white and adhered to the centers, then added some bling snowflakes to each circle. I punched my holes with the crop-a-dile and added ribbon. I used a stickles bottle to insure my loops were the same size, except for the top one I made sure it would fit over a doorknob. Voila it is done!
Normally I don't use pinks at Christmas but I really like how this one turned out. You could easily replace the snowflakes with some other embellie and it would work for a new baby. You could add another circle and change the word. So many possibilities.

supplies: kits2remember acrylic, Daisy Bucket pp, Deja View alphas, MAMBI and Paper Studio bling, Making Memories paint, ribbon

While I was making Christmas decorations I made a little new puppy ornament for a friend of mine. Their little one is getting a new puppy for Christmas this year and she wanted something to give him ahead of time to give a few hints. So here is one thing.
I used an atc size acrylic panel from k2r, pattern paper from the upcoming Christmas Pets ekit from Making Handmade Cards and paint.
I painted the edges of the acrylic with red paint and let it dry. Then I added a piece of pp to the back of the acrylic and a small piece to the front to add some depth. The little puppy is from the ekit and he is layered. I added some stickles and the year and I was done!
I will have other samples from the Christmas Pets ekit from Making Handmade Cards posted on Wed! So be sure to come back to see more of this ekit!
supplies: kits2remember acrylic, Making Handmade Cards ekit, sharpie, stickles, Peebles Inc paint, paint pen, ribbon

Have you all started your Christmas projects yet? What are you making? We would love to hear about them or even see them!

Have a great week!


Saturday, October 10, 2009

Scrap and Stamp & Kits2Remember!

Today is the day for a new challenge over at Scrap and Stamp Saturday! This week we are saying goodbye to summer!
I didn't do a traditional page this week I did a 6x6 metal wall hanging for my sons room. He has been on several adventures this summer so I thought this would be a fun interactive thing for him to have.
I used a 6x6 metal panel from Kits2Remember, this way all I have to do is add a magnet to the photos and they can be changed out really easily! This photo was from last summer but the 3x4 photos I have ordered haven't come in yet.


supplies: Kits2Remember metal panel, SEI papers, My Heart Stamps for You(duck) and My Sentiments Exactly (alpha) stamps, Making Memories hybrid ink, Stazon ink, Colorbox chalk ink, Prizma pencils, twine, Basic Grey alpha stickers

I hope you will come join in the fun this week at Scrap and Stamp.
Be sure to go to Kits2Remember to see the new items that Jessica has in stock. Kits2Remember has the best acrylic out their in my book it is nice and thick but still punches easily with the cropadile!

Sunday, September 27, 2009

Kits 2 Remember tool caddy!

Hey there everyone! Today I finally get to share a little project that I finished up this week for kits2remember. Sorry for the bad photos but my husband had my camera at work all week and of course now that I have it back it has been raining. I should have taken the pics yesterday when I took the ones of my project from yesterday. I have the hardest time photographing acrylic inside!

I have several small glasses and vases on my desk that are crammed full of my tools and such. So I wanted one container that is large enough to hold all or at least most of the essentials. Plus I wanted one that wouldn't get lost on my desk...lol.

I kept it really simple because I am one of those scrappers that forgets where I put stuff if I can't see it. I used five 6x6 acrylic pieces, of course any size would work depending on what you are wanting your end project to be. I used my crop-a-dile to punch the holes along one edge and then I used that edge as a template for the other sides. After punching all the holes I used k2r flourish stamp 1-10 on the 4 side panels. I only stamped twice on each panel with stazon ink. But I switched up the corners so when you are looking at one side it looks as if each corner is done (at least when it is empty).
I used my Cricut (Accent Essentials cart) to cut the label shape (at 3.5 inches) from the pattern paper I used on the sides. I added thickers on the front side. I also chose 3 pictures that I love of Patrick and cut them with my Cricut (at 3.25 inches) as well in the same shape and added to 3 sides. I love being able to cut my pictures with the Cricut because I can't cut a straight line for nothing...well a curve either for that matter! I added a little bit of black ink to the edges of the mats and that was it!
I kept everything flat so that all the things that get piled on my desk doesn't rip anything off or get messed up itself.

I hope everyone had a great weekend! If you haven't stopped by the k2r krew blog lately you should take a few minutes to visit! The girls are always full of inspiration for uses for acrylic, metal and chipboard!

Thursday, September 17, 2009

What time is it?

Time has just gotten away from me this week. I have been busy getting things back together after all of us being sick for 3 weeks. Plus trying to get all of the baby/kids stuff labeled for Kids Market, which is a big consignment sell for kids/maternity stuff they do twice a year around here. It is an awesome way to sell what you don't need and to get some great deals on other things you do. Now on to my kits2remember project. I have really been slacking on my duties, and I am very sorry for that. I have just not had any mojo with all that has been going on. But I promise there will be more to follow soon.

I got this made over the weekend but just got to get a picture of it because of all the rain. I wanted to make another clock. I started out with plans for it to be in my kitchen so I was going to use an old wooden spoon for the holder but alas my plans changed and I am not even going to keep it...lol. My best friend has a birthday coming up and she has been wanting a new clock so I am going to send this to her...plus she can add a favorite photo.

I love black and white with a pop of hot pink! So I couldn't help but play with it here too!
I used a 12x12 acrylic piece, 3 Bugs numbers from a previous krew kit, stazon ink, GCD papers, flowers from the local dollar store, my Cricut (Zoobaloo cart) and buttons.

The only thing is I have to go and buy a new clock assembly. My nephew decided he liked the looks of them and broke them...lol. I should know better than to leave it down when he is here.

I hope you like it! I really do like how this one turned out. Now I need to make me one! I hope you all have a great weekend and get to spend it doing something you love!

Happy Crafting!!

Thursday, September 3, 2009

back to school name tag

First off I would like to say I am sorry that I was MIA last week and most of this one. My guys had the flu so I had no time at all to scrap.

I know alot of you are just now getting back to school. We have been going strong for three weeks now. So I thought I would share the little backpack name tag I made for Patrick this year. I used a piece of kits2remember atc size chipboard, acrlic and metal would work great for this too.
Patrick loves dinosaurs expecially the t-rex so I used one of his stamps for this project. I covered the chipboard with some Basic Grey papers and added a handcut tree. I inked the edges and added his name. It only took about 5 minutes to complete...seriously.

My little guy carried a picture of us in his pocket everyday last year, since he could have a bookbag this year I decided to add one to the back of the name tag. I used an o-ring to hang it from the bag.
(I don't know why the photo flipped back on its side but I couldn't get it to load correctly on blogger for some reason)
Now with a personalized name tag I know he will always grab his bag and not another classmates. It is an easy way to let their personality show and it could be so fun to bling up one for a little girl.

I will have a larger project next week for you. I have a couple in the works right now and as long as everyone stays well they will be done soon.


Wednesday, August 19, 2009

Beach ball album

This summer Patrick got to spend some time with his dad. He flew down and they spent a weekend at the beach before going to Colorado. So I thought it would be fun for Patrick to have a little album of their fun time together. I was hoping to have the photos already but they haven't arrived yet.

For this album I used five 5 inch circles from kits2remember, paint, white stazon ink, Making Memories papers and ribbon.


I drew the picture I wanted on the outside film and then painted the colors I wanted. After all the paint was dry I painted in the black lines on both sides of the acrylic. I kept the paint on the inside of the cover. I added some rubon's and I was done.
The inside pages are all the same. I cut five 4.5 inch circles and three 4.25 inch circles. This way I can add 4 inch circle photos. I altered the paper circles on either side of the acrylic. This way some of the photos will have a double mat. I added ribbon tags on the 3 inside pages and the o-ring.
Now all I will need to do is add the photos and a few extra embellies if I decide to.
I doodled stitching on each page and added white stazon to the edges of the acrylic.

Now Patrick will have a fun little album of him and his dad. I love playing around with the circles. They make for quick albums and they look great without very many embellies.

I am using this for a few challenges...I hope it works even without photos...lol

RosieDee-sun

The Pink Elephant-summer

Happy crafting everyone. I will see you next time with another fun album!

Saturday, August 8, 2009

Scrap and Stamp Saturday challenge 6

Guess what today is? Time for another Scrap and Stamp Saturday challenge! Woo Hoo! I had fun with this one...lots of distressing and color...definitely my style.

This weeks challenge is a simple one. Some sort of embossing plus stamping. Easy peasy right! I hope you will join in the fun this week. We would love to have you.

I used some of my fav products on this one. I love this flourish stamp from kits2remember and it can work on a boy page too! The journaling stamp is another fav from my friend Sheila at Thats Jazzy Stamp Dream. It is a single line that looks like the kids writing paper. So many possibilities. And I love these Zachs life papers. I embossed all the orange papers (except journaling block) with a Fiskars embossing thing.

supplies: Little Yellow Bicycle pp, Kits2Remember rubber stamp, Thats Jazzy Stamp Dreams acrylic journaling stamp, Tim Holtz ticket, Buttons Gallore buttons, Ranger distress ink and paint dabber, Stazon ink, Scenic Route chipboard, twine

I hope you will join us at Scrap and Stamp!! Head over there to see what the prize is this week!!

Wednesday, August 5, 2009

Kits 2 Remember mini fridge calendars

I don't know about you all but I have been thinking about Christmas lately. It will be here before we know it. That is where my project for today has come from. Our extended family always draws names for the adults and buys all the kiddos gifts. But I still like to give every family a little something they can use, that I can make without a great expense.

I decided to make little mini fridge calendars this year. I used 4 inch acrylic cirlces from the kits 2 remember store for the base of these. But for the magnet on the back I have taken the magnets that come on the front of the new phone books and cut them into strips. I have tons of these around from when Patrick was little. They were the perfect size for him to play with and I didn't have to worry about him swallowing them...lol. They are 4 inch squares, I have even used them for my calendar base in the past. They use to be alot thicker than the ones we have received the past few years.

Here are the magnets I used...

I have ordered little index print size photos of each of the families. I got some great shots of each individual family last year so I am going to use those. I try to match them to their decor or personalities if possible. It makes it more personal rather than mass produced.

For the calender pages I just looked online for some printable pages. I found mine HERE I cropped the top portion off since they had images at the top. And printed them out at wallet size.

I punched holes and added brads to hold the pages together and on the acrylic. But I have also run a line of hot glue across the top to hold the pages together before. It works great.

This one is actually for a single cousin so I got to use lots of bling on this one.

This one is for a bachelor friend of ours who is more like an uncle. He loves to get pics of Patrick and his 2 cousins. So I will use a photo of the boys on this one. I sprayed the entire thing with silver glimmer mist including the calendar pages to keep them from being so stark white.

This one is for one of our cousins. He is a single dad with 2 boys. So I tried to keep it....boy!
I have 3 done and many many more to do. Have you started making Christmas gifts yet? What type of things to you make? I would love to here or even see them. I still have lots of other things to do as well so I could use some ideas.
Don't forget there is still time to get in on the k2r contest! It ends August 14th. Go HERE for all the details.


Tuesday, August 4, 2009

a couple of cards

I got about 30 minutes to play around today and managed to whip up 2 cards. I wanted to work on a couple of other things but I was needing the instant satisfaction of a card today...lol

I used sketch 12 over at Midnight Madness for this one. I also used the corner flourish rubber stamp from kits 2 remember. I love this stamp. I wish you could see it better, it ended up with most of it covered by the time I got done adding the flowers. No worries you will be able to see it on another project this week or check it out HERE. After I was done with the card I spritzed the entire card lightly with gold glimmer mist. I found a friendship quote online and then altered it some in Word. I like the way it turned out. I was going to post it here as a freebie but haven't figure it out yet...lol. If you would like me to send it to you just email me at rlhudson94@hotmail.com

When I first saw this sketch I was a little hesitant. I am horrible with tags. Now that it is done I am loving it! I see me using this one again and again.


supplies: K&Co pp and tag, cs??, DCWV flower brad, Prima small flowers, Kits2Remember rubber stamp, Tattered Angels glimmer mist, Ranger distress ink, Making Memories pins, fabric flowers, lace, ribbon, quote off internet.

This one is for several challenges.

Midnight Madness-sketch
Whimsy Stamps-friendship
Dutch Dare-lace
Little Yellow Challenge-lace and pearls
2 Red Bananas-quote as main feature
One Stop-swirls and pearls (hope it works eventhough most of the swirls are covered. swirl stamp and swirls in the paper)
Pile it on-at least 3 flowers

Spoonful of Sugar-flower frenzy

Closeup of the details.


This one I am not so sure about. I made it for a friend who picked out the papers, wanted circles and no flowers. She loves it I am not so sure about it. What do you think? Be honest I can handle it...lol.

Midnight Madness-sketch
Color Create-orange, pink and green

supplies: Sassafrass Lass pp, Ranger distress ink, Stazon ink, Rubber Stampede stamp, buttons, twine


Friday, July 31, 2009

gift set using Kits 2 Remember and Simply Sassy Designs

Here is a quick little project I did for our nieces birthday. She is constantly writting and drawing so I thought a pretty little notebook would do the trick.
The notebook is 5x7. I took a dollar store find with flimsy covers and removed the covers and replaced with 2 pieces of kits 2 remember chipboard. I used 2 pieces of 8x8 chipboard and cut them down. Simply use the covers you remove for a template to punch the holes. I used some fun Cherry Arte papers, various flowers, buttons, diamond stickles and scraps of ribbon.

I added stickles to the inside of the flowers on the paper and along the edges of the diecut flowers. Instead of bling swirls, which was my first thought, I decided to go with stickle swirls. They don't show up really well in the photos but they add just enought shimmer. The alpas are some old Arctic Frog rubons.

I covered the front with this fun pattern and the back with just the green houndstooth pattern. The inside has a wide stripe paper and I made a little pocket on the front cover with the green. I just used a scrap of papper folded in the edges a little and used my circle cutter to cut a little spot out of the top.

I made a matching book mark with stickles on the flowers ans some Rebekka Erickson rubons.

here is the inside. I will tuck the bookmark and either some cash or a gift certificate in here for her.
Of course there had to be a matching card too.


I used this fun digi stamp from Simply Sassy Designs for this. I layered 2 images together and popped them off the card. I used scraps from the previous project, along with various flowers, stickles, button, ribbon and Fiskars punch. The sentiment is a Studio G stamp. I just stamped on a scrap of paper and cut into a tag. It is the perfect size for this little gift! Again I added stickle swirls.
Closeup of the card. Be sure to check out Simply Sassy there is new products being added daily. We have some really amazing ladies creating new and fun stuff! If you are looking for a fun message board check out our new forum HERE! We are just getting started but there is already a fun group of ladies with us!

I rolled the edges of the diecuts t give a little more depth.
I think these would make great teacher gifts as well. It is hard to believe that it is time to start thinking along those lines again. It seems summer just started. But they start back here this week and the next. Have a great weekend and happy crafting. I plan to get some things made this weekend! Woo Hoo!!
This works for several challenges
High Hopes-sparkle and shine
Color Create-pink, orange, green
Be sure to check out the RAK over at k2r it is for an 8 inch acrylic stadium album! The winner will be picked this Sunday!




Sunday, July 19, 2009

kits 2 remember atc album

I hope everyone is having a wonderful weekend and getting alot of scrappy projects done to get in on the kits 2 remember kontest! If you haven't heard about it yet be sure to check here for all the details.

For my project this week I used 5 pieces of ATC acrylic, white stazon ink, a scrap of My Minds Eye papers, ribbons, skittles, paint, Bazzill, Maya Road and Scenic Route chipboard. I wanted a small album that I could attach to my purse or bag with photos of my guys.

I kept the front simple with a piece of ribbon wrapped around and tied and 3 skittles in the corner with ink on the edges of the panel.
Then I added the pattern papers, chipboard heart and my title on the 2nd page. I painted all of my chipboard elements orange since there was a touch of orange in nearly all of the photos plus the paper. I inked and doodled the edges of the paper and the chipboard and added a title on a strip of paper.
I kept the rest of the pages very simple with a photo, inked edges and a drawn frame around the photos. I added 3 skittles or either a heart with ribbon behind it to each page. For the very last page I just inked the edges that way I don't have to worry about messing up the album.


Now I have pictures at the ready and I don't have to dig around to find them. I didn't realize I have had so much orange in my life until I started going back through pictures. It seems to be a favorite color for me to buy my son..lol.
I hope you get a little time to play with your k2r goodness this week and to participate in the kontest!


Saturday, July 11, 2009

kits 2 remember and others

For this weeks kits 2 remember project I used a piece 6x12 acrylic to make a sign. I used the Cricut (Zooballoo, George and Plantin Schoolbook) and Design Studio to get them all the size I wanted. I have them in a cut file if anyone wants them. I used a fiskars punch to get the extra hearts for the smoke.

supplies: kits 2 remember acrylic, DCWV and Bazzill cardstock, Fancy Pants, Bo Bunny, Bella Blvd, Basic Grey pattern paper (and an unknown for the roof), Cricut, Making Memories glaze, Pebbles Inc paint, The Robins Nest skittles, sharpie, distress ink

After inking everything and attaching them to the front. I flipped it over and worked on the back. I painted it with Making Memories Glaze (Sky) making sure to not paint the windows. After it was dry I used a fine tip sharpie to draw in the curtains and polka dots on them. And then painted in the curtains with Peebles Inc paint. I love the depth it adds and they look like they are on the inside. I added a skittle for the doorknob.


Be sure to check out the krew blog for more ideas on using acrylic and metal. I am using this for the challenge at A Spoonful of Sugar as well, to use hearts.
I have to say I love the sketch for this card and I see me using it again and again it is from The Fresh Batch. I also used the challenge from The Pink Elephant to use stars and strips ( I used strips of twine) and the one from Nutshells to make a boy card with blue and green.
supplies: My Minds Eye and Rouge de Garance pattern papers, stazon ink, K&Co stamp, twine, popdots, sharpie
I love this digi stamp by Charmed Cards and Crafts she is the try before you buy one. I have others but I love her. I used a sketch by 3 Clovers.
supplies: Bazzill cardstock, Junkitz pattern papers, Charmed Cards and Crafts digi image, Thats Jazzy Stamp Dream stamp, Prima flowers, Making Memories Peebles Inc chalk, Around the Block colored pencils,hybrid ink, skittles, stazon ink
The above card is my entry into the Charmed Cards and Crafts drawing for this package of Copics!! Aren't they awesome. I am so wanting some Copics but they are not in the budget for me right now. So I really would like to win these. Head over to Charmed Cards and Crafts to see what you have to do to get in the action. Or not because I really want to win...lol
I have really been using up the scraps lately. All of these projects came completely from my scrap box! I love when that happens.

Wednesday, July 1, 2009

kits 2 remember acrylic album

I hope everyone is having a wonderful summer break! Ours will be busy again for the next few weeks. Patrick finally came home yesterday and we have a few trips in the works. But I have plans to have projects ready before we head out. But for today I am sharing my version of the Starry Black album from kits 2 remember.

The only thing I added to the kit was 2 sheets black cardstock, black ink, gold paint dabber and gold stickles. For the cover I used some stencils for the letters and the star stamps from the kit. Once it was dry I added gold stickles to title and then just the edges of the stars. While I had my paint out I also stamped a star on 6 of the coin envelopes and brushed paint along the edges of the envelopes and all of the acrylic as well.


I kept all of the pages very basic. I cut my pattern papers 6x6 and the cardstock 7x7 for every page and inked the edges. I wanted there to be room for journaling so I added a coin envelope (with the flap tucked inside) to each page. I left room that photos can be tucked under the edge of the envelopes. And then added a small piece of smooth cardstock to each one. I cut the cardstock so it would stick out the end to make it easy to remove from the envelope.


I added a rubon phrase to each of the flaps and stamped the back panel with stars. After the paint was dry I added stickles to the edges of some of the stars and completely covered some of them.
There are so many possibilities for this kit, sports, prom, graduation or even dad. If you would like to get your hands on one be sure to head over to the k2r store and grab one. If you have a moment head over to the krew blog for more inspiration.
Have a great week and enjoy your summer it will be over before we know it!